
Pond Jump Guards
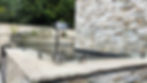
Fusion Glass supplies bespoke pond jump guards manufactured from toughened glass with polished edges and stainless fittings. These guards act as a visual and physical deterrent, helping prevent fish from jumping over the pond edge while preserving the aesthetics of your garden.
As part of our wider pond glass solutions range, our koi pond jump guards are manufactured to exact specifications for raised ponds, stone surrounds and timber pond structures.
For a truly stunning feature in your garden, take a look at what our pond glass can do for you. We have a fully customisable range of Pond Jump Guards, Post and Clamps.
Guaranteed quality
High-performance
Stunning feature
Buy Pond Jump Guards today!
Please note:
If you don't see what you're looking for on our list, please click the button below to fill out a contact form and let us know your specific requirements. We're here to help


Koi Pond Jump Guard
At Fusion Glass Ltd, we offer a premium range of Koi Pond Jump Guards, designed to provide a secure barrier while maintaining the beauty of your pond.
High-Quality Pond Glass, manufactured from 10mm toughened glass, ensuring durability and longevity. Each panel features polished edges with the option of dubbed or curved corners for added safety and a refined appearance.
Unique and Stunning Jump Guards
Multiple Size Options – We provide a variety of standard sizes available on our website. For unique pond designs, we also offer bespoke sizing to perfectly fit your needs.
Secure & Reliable Installation – Our range of jump guard posts, base clamps, and glass-to-glass clamps ensures a strong and stable structure, giving you peace of mind without compromising on aesthetics.

What Are Pond Jump Guards?
Pond jump guards are vertical glass panels installed around the perimeter of a pond to prevent fish from escaping. They are typically fitted just inside or directly on the pond edge using stainless fittings and glass clamps.
Unlike nets or mesh covers, jump guard glass maintains clear visibility into the pond. It provides added safety without compromising design.
For koi pond installations, jump guards are often 300mm high as a standard reference, but height can vary depending on fish size and pond depth.
Jump Guard Glass Specification
Our pond jump guards are manufactured from 10mm toughened glass as standard. This thickness provides strength while remaining visually discreet.
Each panel features:
-
Polished smooth edges
-
Accurate measurements
-
Suitable width and length
-
Stainless fittings
-
Glass clamps or corner clamps
Depending on layout, installations may use:
-
One clamp per side
-
Two corner clamps
-
Multiple panels joined securely
The maximum length of a single panel depends on support conditions. For longer runs, multiple panels may be advisable to ensure structural stability.
You can view related structural options within our custom glass panels range. Also see our pond window thickness guide.
Corner Clamps and Stainless Fittings
Jump guards are typically secured using stainless steel clamps fixed to stone, wood or brick surrounds. These fittings hold the glass securely in place while allowing for easy installation and clean aesthetics.
Corner clamps are commonly used where two panels meet at a corner. In straight runs, glass clamps may be spaced evenly along the length of the panel for support.
Correct clamp placement is crucial. Adequate support ensures the glass remains stable and reduces the risk of movement or injury.
Size Recommendations and Measuring
Every pond is different. Accurate measuring is essential before placing an order.
We require:
-
Total length of each section
-
Desired height above water level
-
Thickness specification (10mm toughened is standard)
-
Clamp type and fixing surface
As an example, a customer with a raised stone pond may require 300mm high panels secured with stainless corner clamps. A timber surround may require alternative clamp positioning. If you are unsure about size recommendations, we can advise based on your pond measurements and intended layout.
Added Safety for Fish and Families
Pond jump guards help prevent fish from escaping and reduce the risk of injury caused by fish landing outside the pond. They also act as a subtle safety feature for gardens with children, without enclosing the pond entirely.
In addition to preventing koi from escaping, jump guards can act as a deterrent to predators such as herons.
Unlike bulky fencing, jump guard glass enhances the appearance of a pond rather than obstructing it.
Installation Guide for Jump Guard Using Clamps
Protect your pond effectively with a sleek, modern Jump Guard system using clamps. This method provides a durable, stable enclosure, perfect for ponds of various sizes. Follow this step-by-step guide to install your Jump Guard system with confidence.
Step 1: Determine Your Glazing Height and Width
Ideal Heights:
-
The glass should typically be between 250mm and 300mm tall for optimal stability and appearance.
-
Custom heights are available upon request to suit your specific pond setup
Maximum Width:
-
Panels can extend up to 4000mm (4 meters) wide.
-
To maintain stability, follow a 10:1 height-to-width ratio (e.g., a 250mm high panel should not be wider than approximately 2500mm).
Note:
Choosing the right size helps ensure stability and safety.
Step 2: Measure Your Pond and Plan Your Layout
Deciding Where to Place the Jump Guard:
-
Choose the location(s) where you want your Jump Guard to run. Mark these points clearly.
Center Line Measurement:
-
For each side where the Jump Guard will be installed, measure the center-to-center length between the start and end points.
Calculating Panel Sizes:
-
Starting from a wall or fixed point, subtract 20mm for the first clamp.
-
To each subsequent join (be it a clamp, glass-to-glass joint, or corner), subtract another 20mm.
-
Add all these sections together to get the total length for that run.
Example:
-
If the total length from wall to wall is 3000mm, starting from the wall:
-
Subtract 20mm for the first clamp.
-
For the next join, subtract another 20mm.
-
Continue this process for each join or corner.
-
Sum these sections to work out the total length of glass needed.
-
Divide the total length by the number of panels you want for that edge to determine each panel's length.
-
This approach provides what size panels you need to order, considering joints and clamps, ensuring a precise fit.
Step 3: Gather Your Components
The Jump Guard system includes four main parts:
-
Glass panels
-
Base clamps (one per meter, plus an extra at each end)
-
Corner clamps (per corner)
-
Glass-to-glass clamps (to join multiple panels in longer runs)
Step 4: Measure and Install the Base Clamps
Preparation:
-
Choose the correct drill bit based on your fixing surface—wood, brick, or stone.
-
Mark the exact positions for each base clamp based on your measurements.
Fixing:
-
Drill into the surface at each mark.
-
Fix each base clamp with a 6mm to 8mm screw—ensure they are level and securely anchored.
Step 5: Fit the Glass Panels
Placing the glass:
-
Remove the clamp face (screws) from each clamp temporarily.
-
Carefully position the glass panel in the clamp’s slot.
-
Reattach and tighten the clamp face, securing the glass firmly—avoid over-tightening.
Joining panels:
-
Use glass-to-glass clamps at 180° to connect multiple panels in longer runs.
-
At corners, install two corner clamps to join the panels securely.
Step 6: Final Checks and Support
-
Confirm all clamps are tight, and panels sit evenly and level.
-
When the Jump Guard ends against a wall, add clamps onto the wall-side glass for extra strength.
-
Periodically inspect and tighten clamps to ensure ongoing stability.
Final Tips & Maintenance
-
Always choose the appropriate drill bit for your surface.
-
Tighten clamps carefully to prevent glass damage.
-
Regularly inspect the entire system and re-tighten or replace hardware as needed, especially after storms or harsh weather.
Protect Your Pond with a Sleek, Secure Jump Guard System
Following this guide will help you build a strong, stable Jump Guard using clamps tailored to your pond’s dimensions. For bespoke sizes or additional support, contact Fusion Glass Ltd. — your trusted supplier of high-quality pond safety solutions.
Complete Installation Guide for Jump Guard Posts
Protect your pond and aquatic life with confidence! Follow this detailed step-by-step guide to professionally install your Jump Guard Posts, ensuring a secure and durable pond perimeter.
Step 1: Choose Your Jump Guard Post Style
Overview:
Our Jump Guard Posts are available in various styles, including mid posts, corner posts, and end posts. Constructed from durable materials like aluminum or steel, they feature interchangeable end caps and adjustable fittings for flexible installation.
Tips:
-
Pick a style that suits your pond’s shape—whether curved, rectangular, or irregular.
-
Match finishes and hardware to your pond’s aesthetic—modern, rustic, or natural finishes.
-
For ponds with koi or delicate fish, select posts with smooth edges or adjustable fittings to prevent injury.
Step 2: Measure Your Pond for Post Placement
Tools Needed:
-
Reliable tape measure
-
Marker or chalk
-
Level (optional but helpful)
Procedure:
-
Accurately measure your pond’s entire perimeter.
-
Space Jump Guard Posts approximately every 1.5 meters or as per your manufacturer’s recommendations.
-
Mark each post location along the perimeter, including corners and sharp angles for added stability.
Note:
Using a mixture of corner, end, and mid-posts creates a robust, secure Jump Guard enclosure.
Step 3: Prepare and Drill the Site
Preparation:
-
Clear the area of plants, debris, and obstacles.
-
Mark drill points precisely at each post location.
Drilling:
-
Select the proper drill bit based on your ground material (metal, wood, composite).
-
Drill into the ground or continuous anchors at each mark.
-
Fix the base plates or brackets supplied with your Jump Guard Posts using anchors, bolts, or screws.
-
Ensure each base is level and securely fastened for a stable foundation.
Attachment:
-
Attach each Jump Guard Post securely onto its base, maintaining an upright and stable structure.
Step 4: Measure Between Posts for Panel Fitting
Process:
-
Measure inside-to-inside distances between each adjacent post with a tape measure.
-
Record measurements carefully and double-check for accuracy.
Tip:
Always measure from the inside face of each post to ensure your panels or glass inserts will fit precisely.
Step 5: Calculate and Order Your Jump Guard Panels
Adjustments:
-
Subtract approximately 40mm from each measurement to allow space for mounting hardware.
Example:
-
For a 1500mm gap, order panels around 1460mm long (1500mm - 40mm).
Ordering:
-
Provide these measurements to your supplier for custom-made panels, typically toughened glass or durable composite materials, suitable for aquatic environments.
Step 6: Install the Jump Guard Panels and Secure the Posts
Preparation:
-
Unpack and carefully inspect the panels for damage.
-
Gather tools like Allen keys, clamps, or fittings.
Installation:
-
Loosen the clamps or fittings, then slide the panels into place.
-
Tighten clamps securely — avoid over-tightening to prevent damage.
-
Confirm that all panels are level, flush, and securely fastened for maximum safety.
Final Tips & Maintenance
-
Verify all measurements before ordering panels for a perfect fit.
-
Regularly inspect hardware, tightening or replacing components as needed, especially after storms or harsh weather.
-
Periodically check the entire Jump Guard structure for stability and alignment to ensure lasting durability.
Protect Your Pond with Confidence — From Fusion Glass Ltd.
Following these instructions will help you install durable Jump Guard Posts that safeguard your pond effectively. For further advice or professional installation services, contact Fusion Glass Ltd. today.
Design, Aesthetics and Finish
Jump guard glass is designed to enhance the pond, not dominate it.
Clear toughened glass with polished edges ensures smooth lines and minimal visual interruption. When glass meets at corners, stainless fittings provide a secure and clean join.
The result is a secure and practical solution that maintains the style of your pond and surrounding garden.
Ordering and Lead Time
All pond jump guards are manufactured to order.
As a bespoke glass supplier, we do not rely solely on stock sizes. Panels are cut to exact measurements, ensuring a precise fit.
To request a quote, please contact our team via our glass supplier contact page. We will advise on size, clamp options and suitability based on your pond design.
Lead times vary depending on size and quantity, but we aim to provide a prompt and reliable service across the UK
Also see, How to Fit a Pond Viewing Window
Are you thinking of adding Jump Guards to your pond?
Call Fusion Glass Ltd in Leeds today to find out more about adding a stunning feature to your outside space. We also supply Pond viewing windows to enhance the look for any Koi pond.